
Setting up your Turneo Store
1️⃣ What is a Store and why do you need it?
Store enables hotels to associate experiences they want to sell with their Turneo profile. You can associate both experiences already existing on Turneo or the ones created specifically for your hotel.
Store setup is the pre-requisite to use Elements which enable hotels to embed experiences across their website.
- If you do not have a website or want to sell experiences through a standalone website, setting up your Store will also automatically create a unique experiences shop. It will contain all experiences you associate with the Store and have a public link with a custom name you select and turneo.travel domain (e.g. jadebeach-hotel.turneo.travel) . You can decide to use this link to sell your experiences.
- If you have your own website, we recommend using Turneo Elements to structure your experience offer across different placements on the website. In that case, you do not need to use turneo.travel link and it also won't be visible anywhere else.
Whether you decide to sell your experiences through a Turneo Store or you want to embed experiences directly on your website with Turneo Elements, setting up your Store is always a first step as it associates experiences to your profile and customises settings which will impact all your experiences (e.g branding, customer support, translations).
Access your Store setup:
2️⃣ When to use one vs multiple Stores?
If your hotel has multiple properties or destinations, you might wonder whether to set up a Store for each destination or to set up a single Store for all your experiences. Both options are possible, a single Store can still support multiple locations, but also one location can have multiple Stores.
To simplify your decision, consider these factors:
- If you decide to handle your own customer support and want to use a different support email or number for each property or destination, you'll need to set up multiple stores.
- If you want to have specific analytics on booking volume and revenue for each property or destination, you'll need to set up multiple stores. Otherwise, metrics for all your experiences will be merged together under one overview.
3️⃣ Add new experiences to your store
- Click Edit 🖋️ on an existing store, and choose Experiences from the left hand menu
- Set your destination - use this if you want to see experiences we already have available in your area. If you don’t see your local area come up, you can leave this blank
- Click Add experiences ➕ to choose experiences to include in your store
- Scroll through the list or use the search bar to find specific experiences
- When you’re ready, click Add to Store
- Click Confirm
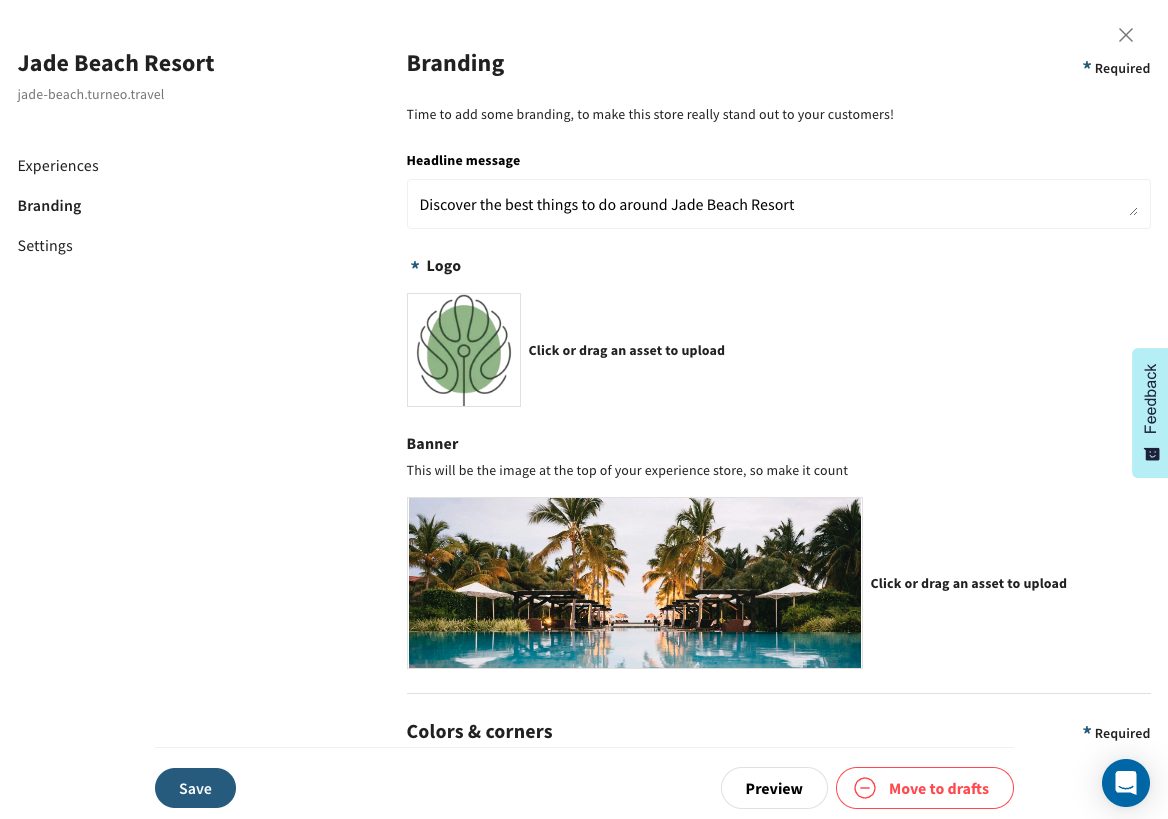
4️⃣ Add your branding
- Click Edit 🖋️ on an existing store, and choose Branding from the left hand menu
- You’ll be able to edit:
- Headline Message - appears at the top of your homepage when guests open your store
- Logo - appears in the top left hand corner of your experience store, and in all experience booking emails that go to your guests
- Banner image - the cover photo that will appear at the top of your experience store
- Primary colour - the colour of buttons, icons and highlight on the page
- Corners - choose if experience images have sharp or rounded corners
- Background colour - choose if the background of your store is white or dark
5️⃣ Customise your settings
- The last step of your Store setup focuses on settings which will define the process for all your experience bookings.
- You’ll be able to choose:
- Room or reservation number - decide if you want to collect this information from your guests and whether it should be mandatory field when booking an experience (e.g if you want to ensure only guests can book an experience)
- Support - decide if guests contact Turneo or your own team when they click “Contact Us” on the experience store site
- If you choose to handle your own support you will need to provide us with a support email. You can also provide a phone number and link to chat agents e.g. over Facebook, Whatsapp or similar providers.
- You can choose different option for your in-house vs external experiences
- Languages - decide what languages you want your store to be translated into
6️⃣ Publish your store
To make your store live, you need to add at least one experience to it. Once you filled out all details and have at least one experience, click on 'Publish' to launch your store.